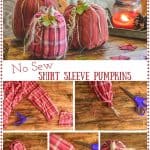
No Sew Shirt Sleeve Pumpkins
I am so excited to share this fun little Fall craft with you guys! We have loved making these No Sew Shirt Sleeve Fabric Pumpkins this week, they are just adorable! And they are just as easy to make as they are cute.
The supply list for these little pumpkins isn’t long, and I bet you have most of the stuff around already! The supplies I didn’t have on hand I picked up pretty inexpensively; a bag of fiberfill stuffing for less than $4 and the jute twine was around $3 at Walmart, you might be able to do better with coupons at craft stores though.
No Sew Shirt Sleeve Pumpkins Tutorial
I promise this is actually very easy, I have broken it down step by step for you.
- Find an old long sleeve shirt that you think would make a cute pumpkin
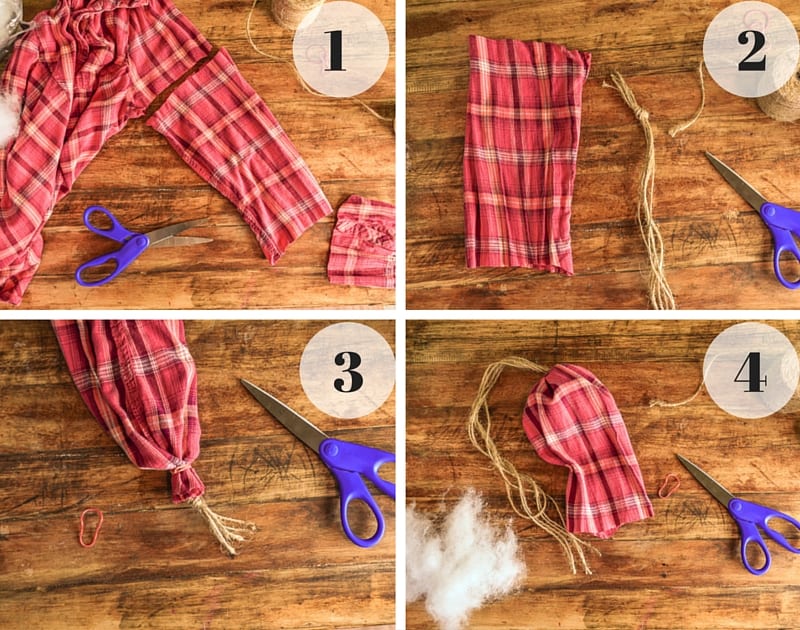
- Cut a section of the shirt sleeve so that it is straight on both ends. One end will be wider than the other.
- Turn the sleeve inside out. Cut 6 lengths of jute twine that are a little longer than the sleeve section, Tie all six of the strands together with one knot and insert the twine so that the knot protrudes from the wider end.
- Gather up the wide sleeve end with the knot, and secure with a rubber band.
- Turn the sleeve right side out, the longer twin sections will now be visible and the knot will be inside the soon to be pumpkin.

- Stuff the sleeve with the polyester fiberfill until it is pretty full (no-one wants a flat pumpkin!) and secure the top with the second rubber band.
- Gather the twine around the pumpkin, spacing them as much as possible, and secure them through the rubber band. Adjust your pumpkin and make it take shape! Firmly tug on each of the twine pieces until you have achieved the look of pumpkin sections, tie them off two at a time. You can also pull up the sleeve end to help smooth the pumpkin.
- To make the stem: Using another length of twine (I waited to cut it until I was through, so the length will vary), tie a knot around the rubber band, leaving several inches of twine at the end. Begin wrapping the twine around the fabric. Wind the twine back down and then tie a knot with the other end.
- To make you excess twine look like vines, I like to unwind some of them and even separate them to create the fibrous effect that pumpkin vines have, but I also like to curl one or two also. Protect your pumpkin with a plastic bag, I just tore a hole in it and feed the twine and stem through.
- Coat several of the twine ends with Mod Podge, I just smeared it on with my fingers, you could use a foam brush.
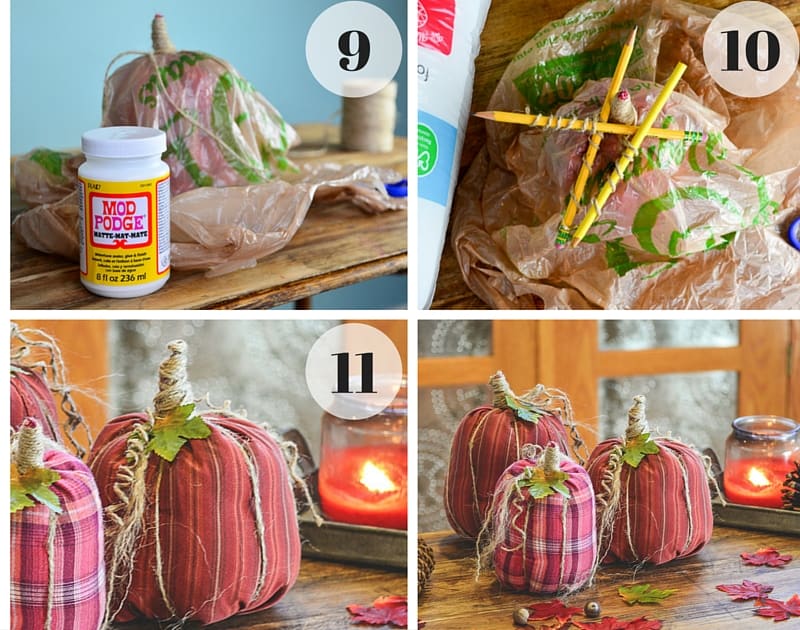
- Wind the Mod Podged twine around a pencil and let them dry about 15 minutes. Don’t leave the pencil in the twine much longer or it will stick!
- Reshape the tendrils as needed after you remove the pencils. I added an artificial leaf to finish off my pumpkins.

No Sew Shirt Sleeve Pumpkins
Equipment
- Mod Podge
- Scissors
- Pencils (that you don’t mind getting glue on!)
Ingredients
- Long-sleeved shirt
- Jute twine
- Rubber bands
- Fiberfill for stuffing
- Optional: Artificial Fall Leaf similar to what I used
Instructions
- Cut a section of the shirt sleeve so that it is straight on both ends. One end will be wider than the other.
- Turn the sleeve inside out. Cut 6 lengths of jute twine that are a little longer than the sleeve section, Tie all six of the strands together with one knot and insert the twine so that the knot protrudes from the wider end.
- Gather up the wide sleeve end with the twine knot, and secure with a rubber band.
- Turn the sleeve right side out, the longer twin sections will now be visible and the knot will be inside of the pumpkin.
- Stuff the sleeve with the polyester fiberfill until it is pretty full (no-one wants a flat pumpkin!) and secure the top with the second rubber band.
- Gather the twine around the pumpkin, spacing them as much as possible, and secure them through the rubber band. Adjust your pumpkin and make it take shape! Firmly tug on each of the twine pieces until you have achieved the look of pumpkin sections, tie them off two at a time. You can also pull up the sleeve end to help smooth the pumpkin.
- To make the stem: Using another length of twine (I waited to cut it until I was through, so the length will vary), tie a knot around the rubber band, leaving several inches of twine at the end. Begin wrapping the twine around the fabric. Wind the twine back down and then tie a knot with the other end.
- To make the excess twine look like vines: I like to unwind some of them and even separate them to create the fibrous effect that pumpkin vines have, but I also like to curl one or two also. Protect your pumpkin with a plastic bag, I just tore a hole in it and feed the twine and stem through.
- Coat several of the twine ends with Mod Podge, I just smeared it on with my fingers, you could use a foam brush.
- Wind the Mod Podged twine around a pencil and let them dry about 15 minutes. Don’t leave the pencil in the twine much longer or it will stick!
- Reshape the tendrils as needed after you remove the pencils. I added an artificial leaf to finish off my pumpkins.
Video
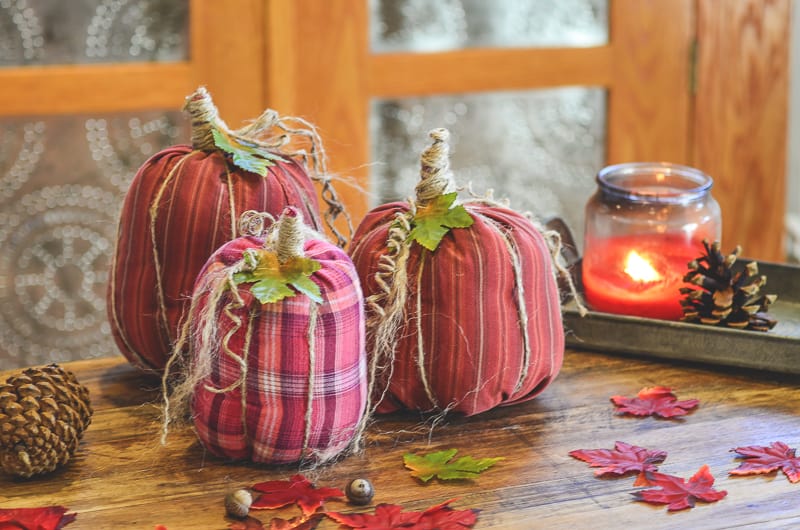
There you have it! Quick and easy No Sew Shirt Sleeve Fabric Pumpkins, make a bunch and create a little pumpkin patch of no sew shirt sleeve pumpkins!


Hello Jen,
I work at a public library, and I’m doing a virtual program on making burlap pumpkins. I will be mentioning other materials people can use to make the pumpkins. I love your no sew shirt sleeve pumpkins, and was wondering if I could copy your instructions and include them in our take-away bag of materials/instructions. I would give you credit on the instructions (used with permission from Jennifer Morrisey) or however you’d like me to word it.
Thank you for your consideration!
MaryBeth
You made that so easy. Thank you. I thought you might want to know that you can get a three roll pack of the jute twine at Dollar Tree for a dollar.
Kandy,
Thanks for posting the info on the jute twine. I will make sure to look for that when I am there next time.
Hi,
I’m making my pumpkins this chilly, rainy Sunday morning. I ended up having everything I needed so I didn’t have to purchase anything. Very clever idea and easy to make! Taking my time so they turn out just the way I want. Good therapy!! Haha Thanks so much for the decorating idea.
Wow these are super cute! Thanks for sharing 🙂
Love this project! Signed up for you newsletter so I don’t miss any more!
Absolutely love this idea and sad because I made some cool summer shirts by cutting off the color and sleeves. Oh, all those sleeves I threw away….. Just a hint for an alternative stuffing. Use your many plastic grocery bags as stuffing and save the oceans!!
This is so cute!! I want to make these with my daughter. It’s definitely something that I’d like to have around for a decoration and that the kids can help with too. That’s such a great combination.
This was featured on the Homestead Blog Hop. I hope we see more from you today!! Pinning!
Can’t wait to try these. Visiting from the Homestead blog hop. Lynn
These are so cute! What’s a creative way to use old flannel shirts.
Stopping by from the Homestead Blog Hop. Your post has been selected as one of this week’s Featured Blog Posts. Feel free to stop by and grab a Featured button to add to your post. https://www.notsomodern.com/homestead-blog-hop-53.html/
This is such a CUTE and unique idea!!
Those are really cute! I’ll put it on the list to make with the grand kids next year. lol
Thank you! They are fun to make, and super easy!!